Category Archives: Uncategorized

Setting S.M.A.R.T. Goals with Students

Goal setting is an important strategy for motivating students and raising their achievement. Done correctly, it will empower your students, giving them ownership and voice over their learning. For more on how I set goals with students, check out these blog posts:

In this blog post, I will go into detail about how to write S.M.A.R.T. goals with students. S.M.A.R.T. goals are Specific, Measurable, Achievable, Realistic and Time-based. That simple recipe can result in very strong goals that will motivate your students! At the bottom of this post you will find the video that I use to present S.M.A.R.T. Goals to my students. Add it to your Edpuzzle account – it’s just about 3 minutes long and packed with great information for students!

First, feel free to download this free SMART Goal template from my TPT store. The template walks students through the acronym and gives a sample goal. Using the template for your first lesson makes setting S.M.A.R.T. Goals a piece of cake! And if you need Data Tracking and Goal Setting Sheets, check out this Student Data Binder, which includes more than 110 Students Sheets to bring goals and data tracking to your classroom!

S = Specific

The first part of the acronym stands for specific. I find that students often make goals like, “I want to be a better reader” or “I want to get a higher grade”. Neither of those goals are specific, and so, most likely, the student will fail. What, exactly, does a student need to do to improve in reading? Are they struggling to decode multi-syllabic words? Are they reading slowly and losing meaning? Do they need more practice with inferential thinking? To be effective, a goal should be very specific. That is the reason that I DON’T set goals in the first month of school. First, we have to gather data. Then, we use the data to pinpoint a Specific area for improvement.

M = Measurement

A goal must be measurable, or the student will not know if they’ve succeeded. Measurable does not always mean percentages, though. For example, in my classroom, students often set goals around reading new genre or a certain number of books. Those are very worthwhile goals, and likely to lead to improved reading achievement. And they are completely measurable, although not a percentage or a score. In Math, my students often set a goal around time spent practicing. For example, one student set a goal of doing Multiplication by Heart at least 20 times in the month of December. I can’t wait to get back to school and find out if she met her goal! If she did, she is sure to improve in her mastery of multiplication facts!

A = Achievable

I often find that students set really large, exciting goals. For example, this year one student said they wanted to read 100 chapter books. When I asked them how many books they read last year, they thought the number was 12 books. So, I asked them if they thought 100 was achievable. Together, we decided to see if they could read 10 books in October, and they did! The student felt excited, I felt excited, and in one month they read almost as many books as they had in an entire year. That is a win! By helping them find an achievable goal, I helped that student find success! (They went on to read 11 books in November!)

R = Relevant

A common mistake I see in this category is students making a goal around increasing their reading level. The truth is, that goal is not relevant to them. While you, the teacher, know that they need to increase their fluency and comprehension by practicing their inference skills in order to reach the next level, the student does not know that. Changing reading levels is a mystery to students (and probably to parents). As teachers, we go to college to learn that type of information, but the student does not have our advantage. So, the goal needs to be relevant to the student. This also ties into being Specific. Relevant goals for students center around discrete skills or tasks, like mastering the multiplication facts, using more dialogue in their narrative writing and reading more non-fiction texts.

T = Time-based

A goal has a start and stop time. Period. This is usually pretty easy for students to understand. In my classroom, we generally set monthly goals. I find that a month is a short enough time period that students will maintain their enthusiasm and focus on the goals. But, it is a long enough time period that students can see important growth. I think quarters or trimesters also work well for goal setting time periods.

S.M.A.R.T. Goals have been such a motivator for many of my students. Use the FREE Goal Setting Student Sheet and give them a try in your classroom. I think you’ll find that, when students set meaningful goals, they generally achieve them and learning happens!

This Student Data Binder includes over 110 Student Sheets for Data Tracking and Goal Setting!

And check out this video from Ms. Cotton’s Corner on YouTube! It’s perfect for teaching students about S.M.A.R.T. Goals! Enjoy!

Simple & Fun Kindergarten Art Project for When Pencil Met Eraser
This kindergarten art project, inspired by "When Pencil Met Eraser" by Karen …
Teach Students to Explain Their Thinking: 4 Little Words
This simple phrase can move class discussions from basic to rigorous. You …

How to Use Google Slides in the Real Classroom

Google Slides are an extremely versatile tool, and probably saved my bacon during last year’s distance learning adventure. Maybe you feel the same, and now you are wondering, what do I do with all those Google Slides? The answer is, you use them, of course! You put blood, sweat, tears and money into creating or buying them, and they have a place in the Real Classroom! Here are four ways I am using them this year, with my real, live, in person students!

Task Cards

One thing teachers often forget is that you can print Google Slides and use them as Task Cards. And who doesn’t love a Task Card? It’s very easy to print. This 1-minute video walks you through it. I recommend using the Print Preview option so that you know what you are printing. Below the video, I’ve also included step-by step instructions.

Click here to grab the Holly-themed Volume Task Cards today!

Printing Google Slides as Task Cards

  1. Open your Google Slides.
  2. Click “File” and then “Print Settings and Preview”.
  3. Choose the print configuration you like. I prefer “Handout – 2 Slides Per Page” and “Portrait” orientation.
  4. Click “Print”.

Pass the Pencil

This is a fun game that you can play with the whole class. You will need one recording sheet for each pair of students, a timer and your computer and projector.

Prep Steps:

  • Copy one recording sheet for each pair of students.
  • Find a timer that you can set for 10-15 seconds. Choose a quicker time for multiple choice Task Cards or content that your students are comfortable with. Choose a longer time if there are steps to complete or the content is newer. For example, every year I use these Thanksgiving Order of Operations Cards with my students. Because they have to work out Order of Operations problems, I give them 15 seconds. This year, I may even give them 30 seconds since we are a little behind where we would usually be in November.
  • Put students in pairs. I group them strategically with one student who is confident in the content and one who is struggling.

Playing the Game

  1. Each pair of students has one recording sheet and one pencil, which they pass after each question. They are working together to get the highest team score possible.
  2. Project the first Task Card and read it to the students. Make sure you are in Present Mode so the students don’t see the thumbnails of the next problems. Then, start the timer.
  3. The pair of students work together to solve the first problem, but only ONE student gets to hold the pencil. The second student can “coach” them, but can’t write! Generally, the second student rereads the problem, gives pointers and hints and checks for accuracy.
  4. The first partner does the work and records the answer on the recording sheet. If a pair gets the correct answer in the time you have set, their team gets a point.
  5. Then, students “Pass the Pencil”. You project the second Task Card and read the problem to the students. Then, start the timer. Now the first partner is the “coach” and the second partner does the work.
  6. Play continues with each partner passing the pencil and doing half of the problems. The partnerships earn 1 point for each problem they solved correctly in the allotted time.
  7. At the end of the game, the team with the most points wins!

What makes the game so fun is the fast pace.  Both students have to look at the cards and solve the problems, even if only one of the partners writes the answer down.  This is a quick way to fit in some practice with a key concept or skill before lunch!

Using Google Slides with Menus

We all know that choice is an important motivator for kids, and grown up people too! Last year I discovered how easy it was to use Google Classroom to create digital Menus for students and I will never go back to paper! Some of the benefits of digital Menus:

  1. Motivation – They say variety is the spice of life, and menus give students plenty of variety! Students set goals and make choices, which is hugely motivating! Imagine a classroom where the kids ask for extra math time…. Yes, it does exist and Menus can help it be a reality in your classroom! (More on that in a future post!)
  2. Differentiation – You can easily put different leveled tasks and scaffolding when you go digital. For example, with my Gifted students I can offer a set of 6th Grade Google Slides, and for my struggling students, I can offer 4th Grade Google Slides. When I assign them using the Google Classroom, they don’t even have to know that there are different assignments.
  3. Fewer papers floating in the bottom of my teacher bag…. I’m sure you know what I’m talking about!

Small Groups – Intervention and Extension

We are all frantically trying to find ways to make up for missed instruction and learning time over the past two years. Google Slides can be a terrific way to help you differentiate your small group instruction to extend kids who are reading and intervene for kids who need more support. They are interactive and colorful, so there is built in engagement.

I often have my students join me for a small group with their Chromebook and a whiteboard. I assign the Google Slides to just that group of students in the Google Classroom. We use the whiteboards to work through the first few slides and then I leave them, in a group, to work together on the rest of the Google Slides. In 5-7 minutes I can get the group going and then leave them to practice while I move to the next group. That saves me time and still gives the students the practice they need to catch up!

Assigning Google Slides in Google Classroom

I buy and sell Google Slides on TPT, so these directions walk you through how to assign Google Slides you have purchased from TPT.

  1. Check out this blog post for step-by-step instructions and a video on assigning Google Forms in Google Classroom. The process is the same for Google Slides. 
  2. When you purchase Google Slides, TPT will automatically add it to a Google Drive folder called TPT Purchases.  Make sure you have logged in to TPT using the account where you want to save the resource.
  3. I recommend clicking on the Google Slides and Making a Copy.  Move the copy to the folder where you want it, and call it the Master Copy.  This will remind you NOT to delete slides from this copy.
  4. Then, make another copy, and feel free to delete slides to create the assignment you want.
  5. In the Google Classroom, Click “Create” and “Assignment”.

6. Fill in the details of the assignment, and then click the triangle icon in the bottom left corner. That will take you to your Google Drive and you can attach the slides.

Google Slides have so much utility and versatility! If you need to pick up a few, this link will take you to the Google Classroom page on my TPT site, and you can grab the resource highlighted in the video and other Google Slides and Forms.

Grab Google Slides and Forms here!

So, dust off those Google Slides and put them to use. I think you will find that they save you time and improve student learning.

Happy teaching!

Susan

12 Quotes to Inspire Students to Make Friends with a Book

Books Are Best Friends Quotes

Books have been great friends of mine for my entire life. They have helped me through times of sorrow and grief, they have taught me the skills to master challenges, they have helped me escape to new worlds when this one was a little too much to take. Books are constant and continual friends for me.

So, it is probably not a surprise to you that I want my students to understand that books are our best friendsl. When I first mention the idea, some of my students roll their eyes. They are fifth graders, after all, and eye rolling is a skill they excel at and practice often. But, as the year rolls on, I notice many students quietly making friends with a book. Activities like Bring-a-Book-to-School Day help, and so do Quote Marks.

Quote Marks are simply book marks with encouraging, and sometimes funny, sayings on them. I generally post the quotes in the Book Nook, sometimes sticking them in surprising places for students to find as they peruse the shelves (for example, the quote from Diane Duane goes on the wall behind her tub of books). I put the same quotes on book marks and let students choose the ones they like. I also use the quote posters as Quick Write prompts to really get kids thinking about the quote. Many of the quotes express the author’s view of books as friends, so they reinforce that I’m not the only one crazy enough to think that!

I’ve put together some of my favorite Quote Marks as a resource on TPT. Click here to grab it! On TPT you will find the vintage style. Or, sign up for my newsletter and download a FREE Chalkboard Style Poster. Grab the style that works best for your classroom.

These are the quotes I’ve used in the resource in case you prefer to make your own.

“If you don’t like to read, you haven’t found the right book.”

J.K. Rowling

“Outside of a dog, a book is man’s best friend. Inside of a dog, it’s too dark to read.”

Groucho Marx

“Fairy tales are more than true: not because they tell us that dragons exist, but because they tell us that dragons can be beaten.”

Neil Gaiman

“Reading one book is like eating one potato chip.”

Diane Duane

“Never trust anyone who has not brought a book with them.”

Lemony Snicket

“…books gave Matilda a hopeful and comforting message: You are not alone.”

Roald Dahl

“It is well known that reading quickens the growth of a heart like nothing else.”

Catherynne M. Valente

“Think before you speak. Read before you think.”

Fran Leibowitz

“Books are the quietest and most constant of friends; they are the most accessible and wisest of counselors, and the most patient of teachers.”

Charles W. Eliot

“That’s the thing about books. They let you travel without moving your feet.”

Jhumpa Lahiri

“Books are good company, in sad times and happy times, for books are people – people who have managed to stay alive by hiding between the covers of a book.”

E.B. White

“You know you’ve read a good book when you turn the last page and feel a little as if you have lost a friend.”

Paul Sweeney

For more tips on how I use this in my classroom, check out this video. Thanks for stopping by today, and Happy Teaching!

Let’s Connect!

You can find Ms. Cotton’s Corner in various corners of the Internet – TPT, Instagram, Facebook, Pinterest and YouTube. See you there!

Check these places to ensure that you don’t miss a thing! And don’t forget to tell your friends! Sharing is Caring!

Book Ballots – 30 Days, 10 Minutes to a More Literate Classroom Part 1

“Oh, it’s Book Ballots! Quick. She’s going to start the timer! You read the blurb for Artemis Fowl and I’ll read Al Capone. Then we’ll talk and figure out what to vote for.”

That is not a bad conversation to overhear as the students file back in from lunch. Book Ballots is one of those strategies that takes just a few minutes, focuses students’ minds on books instead of lunch and recess, and gives you a wealth of knowledge about your readers. This is a great strategy for “Getting to Know Your Readers”, one of our 10 themes for building a more literate classroom. It also helps you “Sell Books” and “Connect Readers”. I love it when a strategy meets several goals! Here’s how it works.

This is what students see as they file into the classroom after recess.

  1. This makes a great transition. While the kids are at lunch, grab two books that you think will appeal to most of your readers. Set them on the chalk tray and draw a t-chart with the question, “Which book do you prefer?” Boom! You’re done prepping!
  2. As the kids file into the classroom, have them gather around the chalk tray. Set a timer for 5 minutes. (The first time you do the strategy, don’t set the timer because you will explain as you go along. But after that, limit this to 5 minutes.)
  3. Tell the kids they need to vote for which book they would prefer to read. They have to vote, and they can’t put their name in the middle. They have to commit to one book or the other. Students will start buzzing about the books and you’ll start listening.
  4. Here’s where you get to know your readers. In a short few minutes, you are going to get answers to questions like:
    • Which readers have a definite preference right away.
    • Who makes book decisions based on the cover.
    • Who grabs the book and makes a more thoughtful decision based on the blurb or reading a sample of the book.
    • Which genres students in your classroom gravitate towards.
    • Who chooses books based on what their friends are reading.
    • Which students have no idea how to choose a book and hang back.
  5. You will get answers to those questions by observing your students. With such a short time to choose, they will have to rely on their go-to strategy. Over time, students will learn strategies for choosing books by watching each other. You will see new students reaching to grab the book, and knots of students gathered around, listening while one student reads the blurbs. You’ll hear quick comparisons between the books, and notice that students start to pay attention to author and genre as a strategy for choosing books.
  6. As you can see in the photo, I have magnets with my students’ names on them that I use for this strategy. The magnets are also used for attendance and lunch count in the morning, so they do double duty! If you don’t have magnets, you could also have your students write their names on sticky notes or on the whiteboard. You could even just have them line up on the side of the room next to the book they prefer.
  7. When the timer goes off (and I have to admit, if the conversation is awesome, I have been guilty of pausing the timer on my phone. 🙂 ) I make sure every student has voted. Then, I “randomly” choose one student for each book and ask, “Would you like to read this book, or gift this book?” My students understand that “gifting” a book means they pass the book to another student who reads it and then has the responsibility of returning it to the Book Nook.

This simple strategy accomplishes a lot in a few short minutes. Two students walk away with a new book to read during Independent Reading time. Other students walk away with a book to add to their Wish List. You walk away with knowledge about your readers that helps you choose read alouds, match books to kids for Guided Reading/Book Clubs, purchase must have books for your Book Nook, and help kids find great books for Independent Reading. It really is an easy way to Get To Know Your Readers.

I use this strategy several times a week during the first month or two of school. As we get into the school year, I taper off and bring in other strategies (more on that in future blog and video posts!) By the winter time, I probably use this strategy once every week or even once every two weeks. It’s a good strategy to bring back if:

  • You’ve gotten some new students in your class and you want to know how they think about books.
  • There are books in your Classroom Library that you think your readers will love, and they aren’t finding them.
  • You notice some students are not finding books easily and you want to learn why.

For more simple strategies to Get To Know Your Readers, check out these posts:

  • Reader’s and Writer’s Surveys
  • Reading Conferences
  • Quick Reads

And be sure to check out this video which gives you more information on using Book Ballots in your classroom!

Assigning a Google Form in Google Classroom

Google Forms have become one of my go-to strategies for distance learning. I embed instructional videos in Google Forms for asynchronous instruction (for more on that, check out this blog post) and I use them for formative and summative assessments. I also use them to create digital Escape Rooms, which my students love! (Check out this blog post for more on that!) With the help of Google Forms, BOOM Cards, and Whiteboard.fi, I have a fairly good idea of what my students can and can’t do, which helps me plan instruction.

This blog post will walk you through how to assign a Google Form in your Google Classroom. We’ll start with a video tutorial, but read on for screenshots and additional tips. In the video, I am assigning Deiondre’s Homework, a Google Form about decomposing fractions. The resource can be purchased on my TPT store, and includes 3 Google Forms and an embedded instructional video.

I hope the video was helpful. You can find more tech videos for students and teachers on my YouTube Channel.

Now, let’s walk through the process of assigning a Google Form in Google Classroom one more time. This time, I am going to assign a Google Form on Equivalent Fractions. You can also purchase this at Ms. Cotton’s Corner on TPT. The resource includes 3 Google Forms, one of which includes an embedded video.

Step 1 – In the Classworks tab of your Google Classroom, click create and choose assignment. You can also choose Quiz assignment if you prefer.

Step 2 – Create the assignment. Give it a title and description and set the points and due date. Then, Click Add, and choose Google Drive. When you purchase the resource from TPT, they will automatically create a folder called TPT Purchases. It will be there unless you have saved it in another folder.

Step 3 – Choose the Form that you want to assign from your Google Drive. I always Toggle Grade importing to the “On” position. Then, once the students complete the work, all I have to do is import the grades with one click. Easy breezy!

Step 4 – Use the Assign button in the upper right hand corner to finish the assignment. You can assign it immediately or schedule it for the future. I often schedule a week’s worth of assignments on the weekend. It is very easy to reschedule if I find that the kids need more or less time than I planned.

And that’s it! Whether you are flipping the classroom, going paperless or teaching distance learning, Google Forms are an easy and effective way to provide instruction and assessment. Click below to purchase either of the resources featured in this blog post.

Deiondre’s Homework – Decomposing Fractions

Finding Equivalent Fractions

Decomposing Fractions – Digitally!

My school continues with our digital learning adventure. Today I want to share with you a lesson I recently taught that went well. I’m happy to say, these are becoming more common as I get better at reaching my students through Zoom. This is a lesson I like so well that I will teach it again – in person!

First, what do I mean by decomposing fractions? I have to admit, when I moved back to fifth-grade after19 years at various other grade levels and educational roles, I did not know about decomposing fractions. Had never heard of it! Thankfully, my neighbor teacher was happy to fill me in.

Decomposing a number means breaking it into pieces. For example, in first grade students should have learned to break 10 into 2 and 2 and 3 and 3. Decomposing is important because mathematicians and scientists need to be able to think flexibly about quantities. This skill will be vital for student success in later grades. Even after students finish school, a person’s ability to do mental computation depends on decomposing numbers. With all the research on how fraction understanding predicts algebra success, decomposing is especially important with fractions.

This examples decomposes three thirds into unit fractions.

The first thing I did was create a video in Powtoons which reviewed this concept for my students. Decomposing fractions is a fourth grade standard, but learning was so disrupted last year that I wondered if they knew how to do it. Check out this preview of the video on my YouTube Channel (you can purchase the whole video, along with three Google Forms on TPT). I assigned the video through Edpuzzle, a free website that I use to help me track students’ progress through videos. For this assignment, I asked students to watch the video BEFORE class, and I paused the video on Edpuzzle to ask a question mid-way through. That data helped me know, even before I began teaching, that decomposing was not a skill the kids were comfortable with yet.

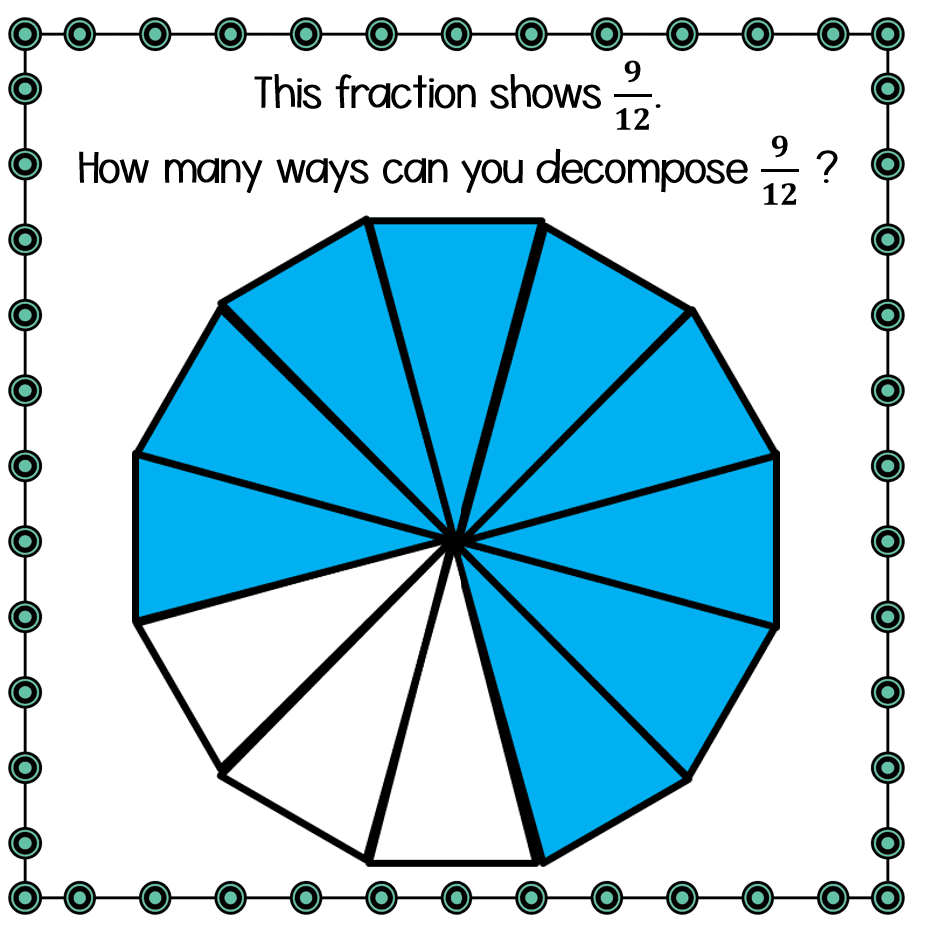
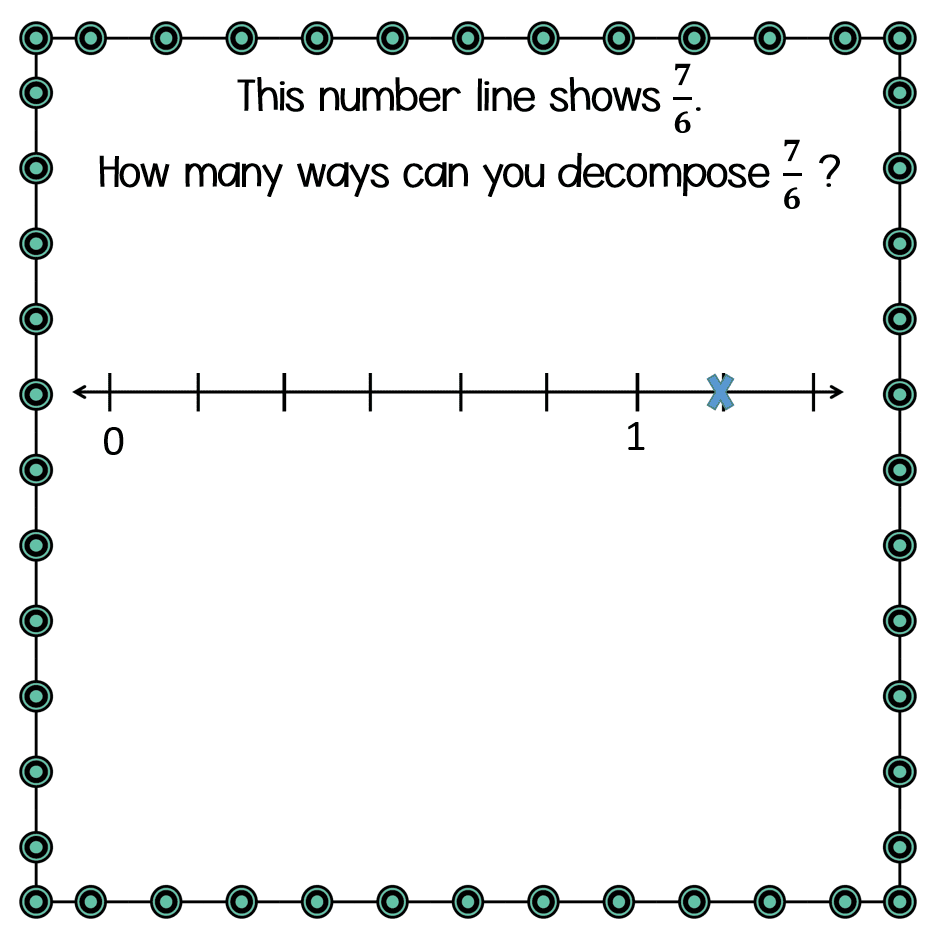
During  our Zoom, we used Whiteboard.fi to practice together.  This is another free website that I rely on frequently during math class because it allows me to see the students’ work, but they can’t see each other’s work.  I even use this website for assessment! These images show some of the fractions we decomposed during this Guided Practice portion of the lesson. On Whiteboard.fi, you can send an image to every student very easily. Feel free to download these images and use them if they are helpful!

Once the students understood the concept, I asked them to complete Deiondre’s Homework #1 for homework before our next class.  This is the first Google Form in my resource, which you can find on TPT. The resource includes 3 Google Forms. Deiondre’s Homework #1 includes the video which students had already watched. Because it is embedded in the Google Form, they don’t have to visit YouTube. Students watched the video individually and completed the Google Form asynchronously. I got the results immediately, which is one of my favorite characteristics of Google Forms! I then analyzed the results to plan instruction for the next class.

Luckily, decomposing came pretty easily for many of my fifth graders, even though I think it was a new idea with fractions. Their experience in lower grades with decomposing whole numbers transferred fairly easily. Based on my analysis, about 2/3 of the class had grasped the basic concept of decomposing fractions. They spent their class time completing these BOOM Cards in breakout rooms with a partner.

These BOOM Cards are for sale on TPT and the BOOM Card website. Grab a set now!

I worked in a small intervention group to practice decomposing some more, and then assigned that group Deiondre’s Homework #3. I chose #3 because that Google Form uses number lines and also emphasizes the unit fraction concept, which three of my students needed to practice.

Finally, I used Deiondre’s Homework #2 as a formative assessment.  Using some free tools, two of the resources from TPT store and three 45-minute Zoom sessions, my students all gained proficiency in this vital skill, which we will continue to build on as we dive more deeply into fractions. You may find that this instructional sequence works for you, or that you use all three for practice and a different formative assessment.  The resource is flexible enough to use in many ways!

I am working to digitize my Fraction-A-Day resource, and it should be done by the end of the week. I will be using that as a follow up to help my students continue to build a solid understanding of fractions.

I hope this lesson sequence is helpful to you and to your students.

Happy teaching!

Susan

Changing the Orientation of One Google Slide

Maybe you have been doing what I have been doing lately – a crash course into all things Google! If so, I can’t wait to share this tip that I just learned!

Often when I create Google Slides for my students, I need some of them to be portrait orientation and others to be landscape. Because Google Slides is meant as a presentation platform, that just isn’t possible. But, we teachers need it to be so much more! We need kids to drag and drop, underline, insert, and interact with the slides. AND we need the slides to go the way we need them to go. Here’s how I’ve solved that problem.

First, since my students need to interact with the slides, they know NOT to use the slides in Present mode. When I’m teaching them, I DO use present mode. This work around WILL NOT work in Present mode, but it is awesome for students.

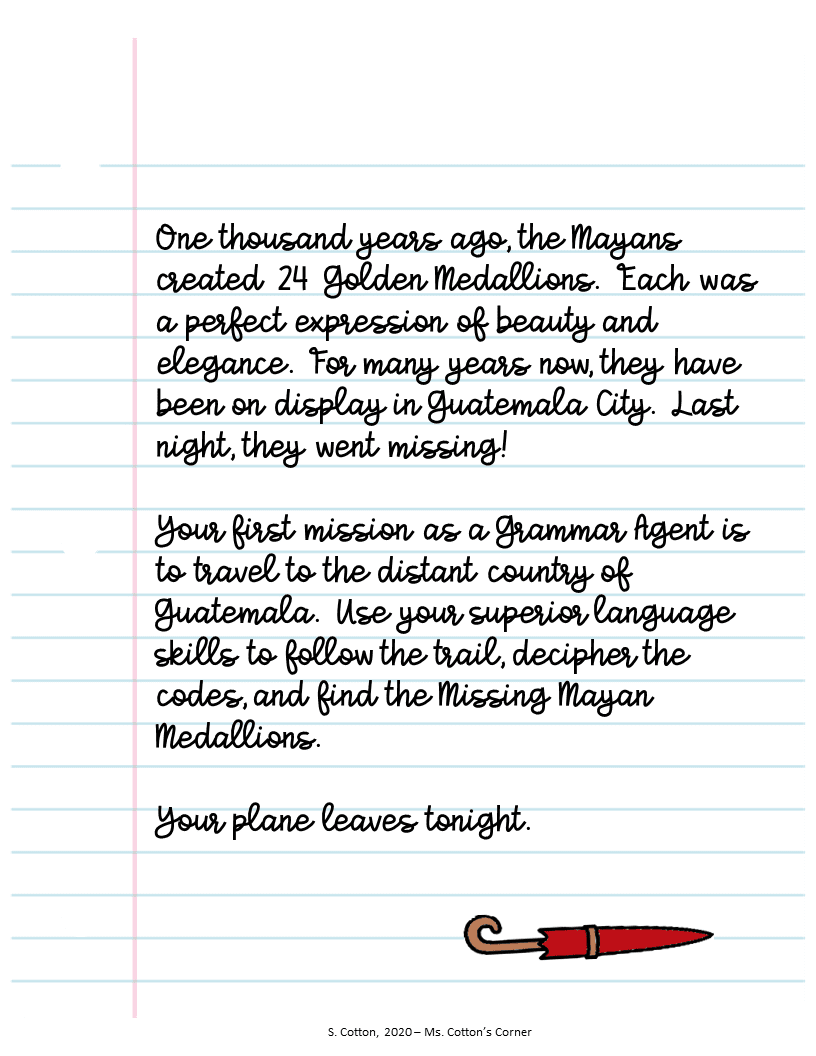
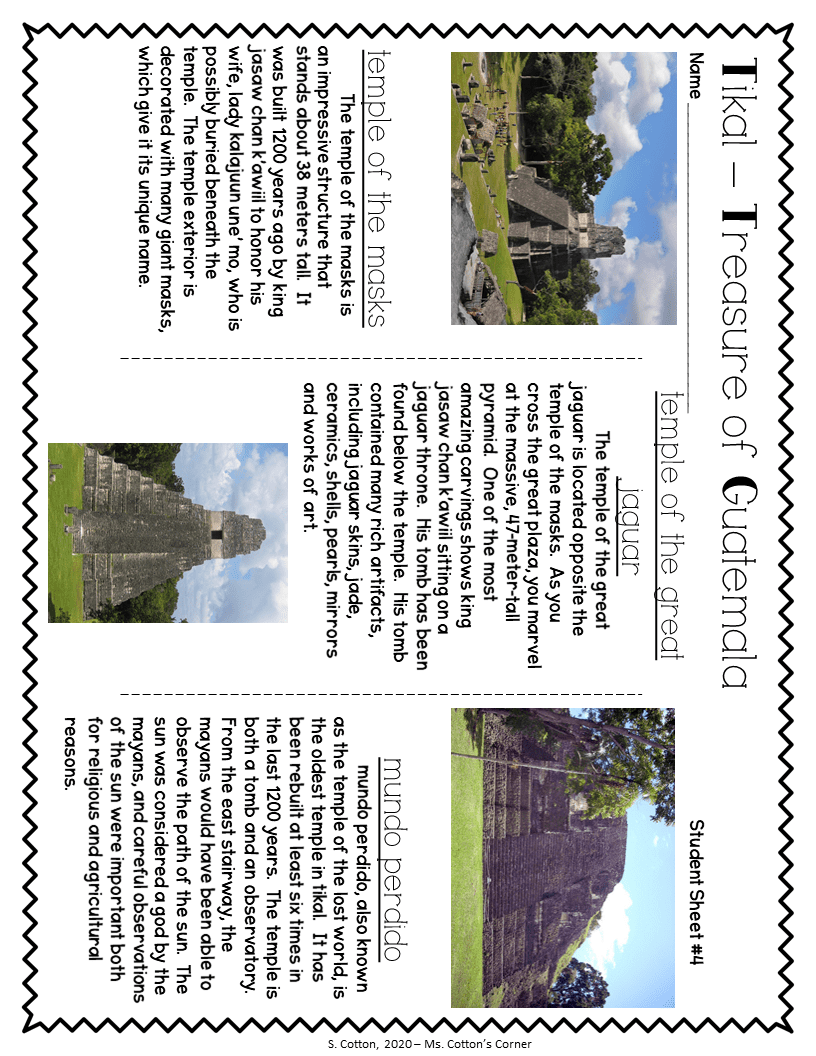
  1. Create the content you need. In my classroom we are working on grammar, so I’ve created this Grammar Adventure for my students. As you can see, most of the slides need to be Portrait orientation, but the brochure about Tikal really needs to be Landscape.

2. I created the slide in Portrait orientation by creating text boxes and images, and then rotating them.

3. Then I downloaded the brochure as a png. Making it a png means the content is locked and no one can edit it – not you and not your students.

4. Next, I created a new blank slide. I inserted the image of the brochure I had just downloaded. Don’t make it a background, insert it as an image. It will fill the entire slide. You are probably thinking, um, yeah, it looks just like it did a minute ago.

5. Now, the work around. Rotate the image. It will hang off the edges of the slide.

Rotate the image, making the orientation Landscape.

6. Go ahead and resize it to cover the entire slide. Now it will really hang off the edges!

The slide will fill more of the student’s screen. If they use Present mode, the edges will be cut off.

7. That’s it. If you want to see a video of this, check it out here!

For other great tech tips for you and for your students, be sure to follow me on You Tube. I regularly post tech tips and instructional videos.

And I have tons of awesome print and digital resources on TPT, including this resource, Grammar Agents – the Quest for the Missing Mayan Medallions! Follow me so you find out about all my newest resources and insights to grow your teaching.

We are all Connected – Building a Virtual Community

It is so important to build a sense of community even though we are not together in the same classroom right now. This summer I spent a lot of time brainstorming and thinking about how to do that. One of the best projects so far has been this art project.

Before school started, we passed out Chromebooks and school supplies to the kids, and I used that opportunity to give each student a copy of this art project which I purchased on TPT. I also included a self-addressed, stamped envelope and asked the kids to follow the directions, and then mail the art project back to school. About half of the students reported that they mailed it on the second day of class, so you know they were excited!

Once I received the art project back, it was very easy to assemble them and laminate them. Since we are not in school, I wanted to put the project on display somewhere the kids could see it. So, I found a local coffee shop with a big wall facing our main street. They were super gracious (thank you Moe’s!), and let me hang up the artwork.

This project was such a great way to start the school year. The kids were excited to share themselves with each other, and the opportunity to share this message with our community was really meaningful to the kids. The project also gave them a sense that we are a team and that we do big things, together. Plus, they think they are famous now! The response from the parents and community has been really positive, too. I think the message really resonates with the adults during these difficult times. It did take some time to assemble and laminate the project, but I think it was well worth the time because the payoff has been huge. I feel like we are well on our way to building a vibrant, connected, virtual community.

Winning Week One – Day 1

There have been millions of texts written on how to launch a school year successfully. Really. Google it. Millions!

So, why do I feel the need to write my own? Well, I’ve been doing this for awhile, and I don’t exactly follow the rules. In fact, we don’t even talk about the rules on the first day. Yep, we don’t talk about the rules. In the many, many years I’ve been doing this, I find that the vast majority of students are well behaved on Day 1. They are trying to impress you. After all, you are going to be a big part of their life this year, and they know that a good first impression is important. I think we should learn that from our students, and worry more about making a good first impression on them. Here’s how I try to do that in person. Or, check out this blog post about how I did that during distance learning.

First, I greet every student at the door with a smile, a high five, a hug…. Whatever they need. I will do that every morning for the rest of the year and it’s best to set that expectation early. Also, many kids are nervous, and your smile goes a long way toward making them feel welcome and bringing down the affective filter a bit.

When they walk into the classroom, they encounter desks with no name tags, but lots of books stacked on them. I ask them to choose a spot where they can learn well, choose a book and start to read. My first act as their teacher is to express confidence that they know themselves as learners and are going to be able to manage their own behavior. I do the same thing whether it’s a kindergarten class or a fifth grade class. Then, I let them know the most important thing we will do this year – read. We will start every day with the most important skill – reading. Now they know what I value, and they will automatically value it because I do.

That first independent reading time is full of opportunity. I notice what kind of book they choose. I see who immediately starts reading and never looks up from the page. I learn which students need to talk about a book to process it. I get a sense of the stamina of the class. After about 15 minutes, I know so much about my students. Then, I tell them that if they have found a wonderful book that they would like to continue reading, they should keep it, and I show them the check out procedures and where to keep their books. If not, no worries. Just put the book back in the pile.

Now it’s time for the first group activity of the year. School has been in session for less than an hour, and I want them to know that we work together. It is their group task to sort the books into groups that go together. I store books in my classroom in a variety of ways – by author, by genre, by topic…. Every year the system changes slightly because the kids come up with it. After all, the system has to work for them. This is our first stab at figuring that out. I make labels and use velcro to attach them to the tubs, so it’s really easy to change labels. Students will likely work for about 30 minutes on creating the system. In that time, as a class, we will probably categorize about 200 books. This is the beginning of a process that will take us several days, but in the end, the kids will be independently able to find, check out, and return books. And that saves me time all year! For step-by-step about how to do this in your own classroom, click here!

Now that the kids have learned that I expect them to make good choices and keep things organized (and remember, I have not said that to them at all. I have just shown them my expectations), I want them to know that I am interested in getting to know them, and in sharing myself with them. So, we play Two Truths and a Lie. I start with two true statements about myself and one lie. The class tries to guess which is the lie. They almost never do….. 🙂 Then I give them their own sheet to fill out, which you can download for free on my TPT store. Over the next few days, we work our way through what they have written and find out who is good at lying (just kidding, we find out all kinds of cool stuff!). We usually do 4-5 per day, so it will take us that first week to read everyone’s.

At some point in the day, and every day for the first week, I want to surprise them. While they are at recess or lunch, I set up a little surprise. On my stool I set a box. It is wrapped, and just to be extra mysterious, I cover it with cloth. I choose some really dramatic music to play. The theme from “2001, a Space Odyssey” is a great choice. As the students file in, I start the music. Even if I stream from You Tube, I don’t turn on the video. I want all eyes on me, and that’s not usually too difficult because I start dancing. Yep. And I’m no dancer. Mostly they watch because I’m so bad. As I dance around, I throw the cloth off the box, then rip off the paper and toss it too. Trust me, the kids are totally transfixed. Clearly, something in this box is pretty special! Inside the box we discover – layers of tissue paper! As I toss those around the room, all eyes are upon me. Then, as the music builds to a dramatic finale (you may want to practice your timing!), I gasp with joy, and then triumphantly hold up – a writing journal! As I bestow (no, I do not pass these out, I bestow them, as befits a great treasure!) the writing journals upon each fortunate student, they can’t wait to get started. Trust me. Every student has something to write about – the crazy teacher in room 205! (By the way, in their end-of-year reflections, this is always someone’s favorite day of fifth grade. The crazy teacher throwing tissue paper even beats out the field trips!)

The Writing Journals are revealed!

After we write, I give them their first homework assignment of the year. Take those journals home and decorate the cover with at least five things that they love. I show mine, which has pictures of my kids on the cover, graffiti art about favorite books, places I’ve traveled recently, music symbols, and other things that I love. The kids have a week to get their cover decorated, and when they bring them back, we have our first writing conference. They tell me why they chose the things on their cover, and I get to know them a bit more. We also have built in topics to write about! I cover each journal with clear Contact Paper to make sure the pictures etc. don’t fall off during the year. For an update on how I’m doing this digitally, click here!

You are probably wondering about math. Of course I do math on the first day! My goal with math on the first day is always to awaken their curiosity and build the idea that math is creative and we have to be flexible. This year, I used a lesson from Jo Boaler’s Mathematical Mindsets, Grade 5. Her first lesson on using numbers and symbols flexibly is just what I want to start the year right. We first watched a brief video from her website, You Cubed, about the importance of struggle in math. Then, I asked the students to look at images of squares grouped in different ways. This was our first Number Talk, and so I guided students through our procedures. Again, I’m not talking about the rules, but I’m setting expectations, and because it’s the first day, students are willing to go with it. Seriously. They do. This activity showed students that there is more than one way to solve a math problem, and the images lower the affective filter and make it approachable for all students. Not bad for day one!

Once in my 25 years of starting this way I had a student misbehave in a pretty disruptive way. Other students talk or goof off. It does happen. I don’t mean to imply that students are perfect robots on Day 1. Of course they aren’t! I gather data on the behaviors they will default to and that helps me plan which behavior focused mini-lessons I should teach, which rules we are likely to need and which students are likely to need more attention from me than others. Day 1 is key for gathering data to inform my practice. Most misbehavior on the first day can be handled with a Pull-Aside – a quiet, private chat with the student where you let them know that they need to reset.

For me, this is a pretty perfect first day. We have gotten to know each other, and we have worked together to create the most important learning space – the Book Nook. We have collaborated at least twice, but also had quiet, independent reading and writing time. We have engaged in interesting reading, writing and math work, and the teacher did something just a little crazy! When I do this well, students leave the classroom at the end of the day tired, smiling, and curious. On day two, they show up eager to see what will come next. Hopefully, they will still be wondering that on day 179!

Keep reading about Day 2 to find out how I keep the learning, and excitement, going!

Photo by Element5 Digital on Unsplash

Wander Words

As you know, teaching vocabulary is near and and dear to my heart. And I love to do it in a playful way whenever possible. I’m always trying to figure out a fun way to engage my students in word play, and Wander Words is the newest craze in my classroom.

Wander Words is pretty simple. The word “wanders” around, and students have to decode it. The word can start anywhere, and can travel horizontally or vertically in any direction. Each word comes with a sentence to give context. For example:

Everyone knows that Ms. Cotton’s favorite cookie is a _________.

Students would connect the letters to spell Snickerdoodle.

I’ve been using these cards in my classroom to help students step up their writing by using more scholarly transitions, and they are having a blast!

This is a really fun activity that exposes students to lots of Tier 2 words. I’ve created sets of task cards, with and without QR codes, that give students practice with lots of great scholarly words. My March 2020 freebie is a great set of these cards to practice scholarly transitions for writing. Be sure to download them today!

You can get other Wander Words Task Cards in my TPT store. Click to go straight there!

« Older Entries Recent Entries »